|
I've been noticing people's Eurorack-Patching habits for quite some time. Some people leave the Patch Cables connected when they're finished working with that piece of gear. Others remove the Patch Cables and "Patch Fresh" the next time they use that Synthesizer. I guess I'm more in the 2nd camp… No matter how complex a Patch is, I'll remove all of the Patch Cables when I'm finished using that Synth for the night. However, I will leave them in, if I need to make a "paper notation" of that Patch — which Ports were connected to which other Ports, Knob, Slider and Switch settings, etc. Once I've drawn this out on a Patch Chart, I'll go ahead and remove all the Cables. I've always done it this way. It probably comes from taking private Synthesizer lessons on a Modular Moog System back in the 70's. Although I had an ARP 2600 at home, I used the University's Studio Moog, to work out any Patch ideas I may have learned that day. However, that Moog was in a standard "Practice Room". This means ALL of the students taking "private" or "class" lessons on Synthesizers had access to that room. There was a monthly schedule posted on the outside of that door and each student was given so many hours per week to use that room. We would simply write our name in any slot that wasn't already taken… as long as we didn't exceed our allotted time for that week. So all Patch Cables had to be removed from the Synthesizer and placed back onto the Patch Stand. The Pros and Cons of this approach First, the Pros… Because I was learning what each Module was designed for, I could easily Patch and adjust the most predominant Module of the Sound I wanted to move from my mind to that Synthesizer. Usually, this meant starting with the Oscillator or Filter. If I had a Rhythm idea, I would go right to the Moog's Sequencer. From these starting points, I would have to think about what my Sound needed and which Modules could perform that function. Of course, there was a LOT of trial and error. Now the Cons… Let's say you're using your own Modular Synthesizer. Removing all of those Patch Cables may make it much more difficult to achieve "all" or "part" of that great Sound you discovered the day before. Especially when you're starting out with even a small Modular System, it can be very frustrating to spend many, many hours creating a great Sound, only to stare at a blank set of Modules the next day. Even if you leave the Knobs, Sliders and Switches in the exact same position, you may never achieve that same great Sound. Not that the Patch Cables will change anything on their own. It's just that we might think the Sound needs just a bit more of this Knob and a little less of that one. Unless your Modules are "digital", containing a simple computer you adjust with its Knobs, Sliders and Switches, getting a multi-Module Patch to sound the same every time is a task for Magicians. Sometimes "modulation signals" (Control Voltages) can modify other "modulation signals".
Helpful Tips All is not lost, however. Some "digital" Modules can store their own settings. There are also "paper" Patch Charts. This is what I learned to use… and still use them. These days, you can also take a photo of all the Modules. However, if you've used a lot of Patch Cables, you may not clearly see every Knob, Slider and Switch setting. Another tip is to use color-coded Patch Cables. The image below is a Roland System 500 Eurorack System. As you can see, the black & red appearance may look really cool but this is not a Patch "I" would want to troubleshoot… or even adjust. Yes, you know where all your Oscillators and Filters are located but it's the "interaction" between every Patched Module that makes it difficult to keep clear in your mind. 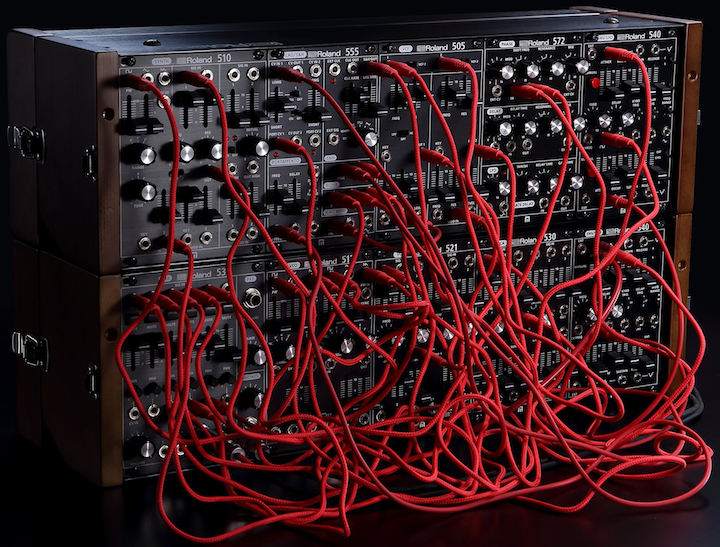 Some people use specific Cable colors for specific Patch connections: 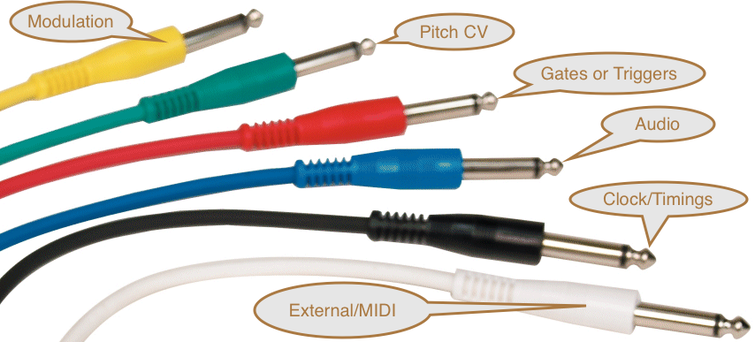 Although this is a good method, deep in mind that you may have LOTS of Modulation connections, many Pitch connections, tons of Gates, etc. My approach is to simply grab a different color each time I reach for a Patch Cable. Yes, this could mean that you'd be looking at something like this… 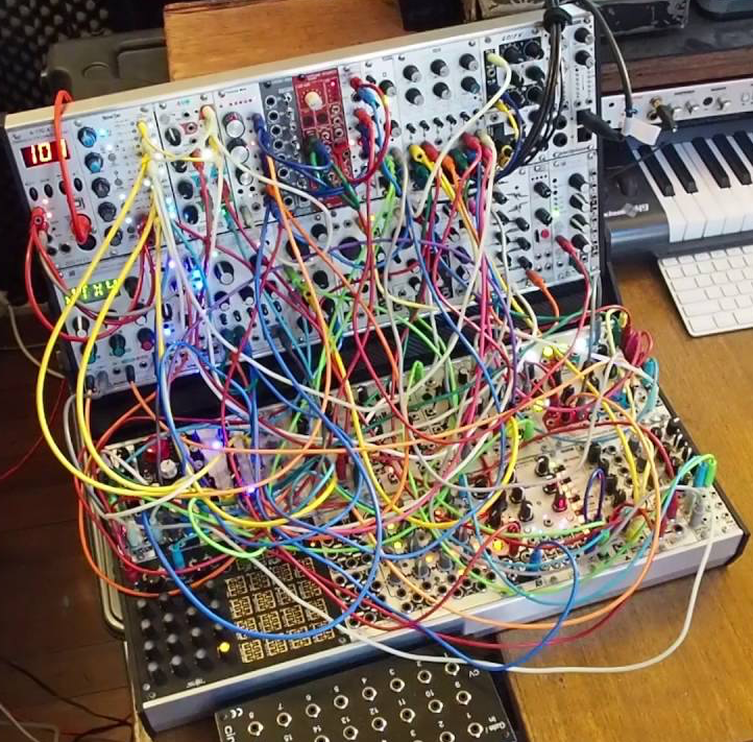 …but following different colored Patch Cables is much easier than working with all Cables of the "same" color.
These are just "my" thoughts on this. Of course, "your" mileage may vary. I found the above image here: www.youtube.com/watch?v=XdxbkSdzDho
0 Comments
Leave a Reply. |
Note:
If you'd like to "Follow", "Like" or "Comment" on our Blogs, please visit our mirrored Blogsite: Archives
November 2018
Categories
All
|
 RSS Feed
